The Master Fusion Series systems all require annual maintenance to ensure they're effectiveness. The ozone generators on Master Fusion products are delivered factory tested, calibrated, and adjusted for maximum efficiency and long life. Simple maintenance and appropriate operating conditions are the only requirements to keep the units functioning within manufacturer's specifications. Each ozone generator contains a housing for the circuitry, tuing, and corona discharge cell. There are a few essential practices to maintaining and cleaning the ozone generator.
User Settings
The user settings should always be checked and maintained. There are three key user settings that can be adjusted on the control valve, based on the given application:
- Hardness setting (default is 10)
- Controls the metered regeneration frequency
- The hardness is set based on influent contaminants and their concentrations
- 1 ppm Iron = 5 gpg, 1 ppm Manganese = 10 gpg, 1 ppm Sulfur = 28 gpg
- Use when a Fusion is being used to reduce “nuisance” bacteria
- Use when a Fusion is being used as a standalone solution for iron and/or manganese
- Day override (default is 3)
- Controls the day override regeneration frequency (will regenerate every set number of days regardless of usage)
- Should generally not be adjusted to more than 3 days
- Regeneration Time (default is 1:00 AM)
- Controls the time of day the unit will regenerate when necessary
Fusion Ozone: Enhanced Oxidation Generator Annual Maintenance
In addition to standard annual maintenance of water conditioning equipment (checking injector, drain line components, etc.), the following should be done on all ozone-based filters:
Changing the Brine Line Check Valve.
-
- The white disc is a Kynar check valve with a Viton diaphragm. The barbed connection should just pull out of the tube. If the tube is cold and it is difficult removing it from the check valve then warming the tube with hot water will help.
- Disconnect the ozone tube from the corona cell.
- Submerge the tube end (above the check valve) into a cup of hot tap water for 3 minutes
- Pull tubes from the check valve and replace the check valve with the beveled side of the disc facing towards the suction end.
Changing the Brine Line Check Valve and Cleaning the Corona Cell
-
-
-
-
- Disconnect the power connection from the ozone generator.
- The white disc is a Kynar check valve with a Viton diaphragm. The barbed connection should just pull out of the tube. If the tube is cold and it is difficult removing it from the check valve, then warming the tube with hot water will help.
- Disconnect the ozone tube from the corona cell.
- Submerge the tube end (above the check valve) into a cup of hot tap water for 3 minutes
- Remove the blue cover from the body of the black body of the ozone generator.
- Remove the blue pumice stone air filter, outside of the ozone generator housing, from the clear tube.
- Remove the zip tie on the corona cell (if present) and carefully remove the corona cell from the brackets that attach it to the board.
- Carefully remove the red electrical connection from the bottom of the corona cell.
- Disconnect the cell from the unit.
- The cell needs to be flushed with high purity water, either R.O., D.I., or Distilled water. Now you’re ready to flush the cell.
- Use a bulb or large 60 cc syringe to flush water through the corona cell.
- Pull back on the syringe to pull water into the cell and push to flush the water out. You’ll need to continue this process until the water in the cup is completely clear.
- Once the cell has been completely flushed and the water is clear, its time to dry the cell. Use a compressed gas duster (or computer dust spray) by placing the nozzle into one of the tubes on the cell and depressing the trigger until the moisture is gone from the cell.
- Pull tubes from the check valve and replace the check valve with the beveled side of the disc facing towards the suction end.
- Now that the Corona cell is clean, it can be reinstalled into your unit. Cleaning the corona cell can be completed quickly and will keep the unit at peak performance for years to come.
-
-
-
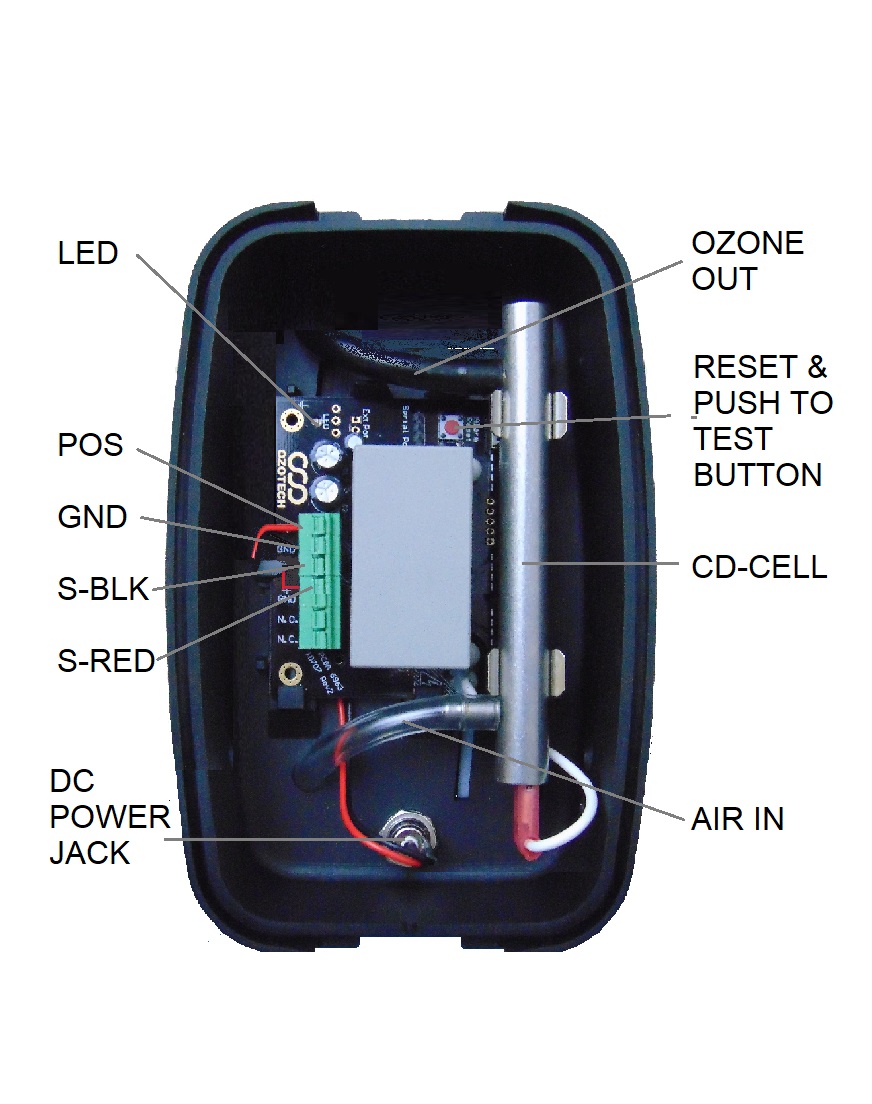
Internal Layout of Ozone Generator
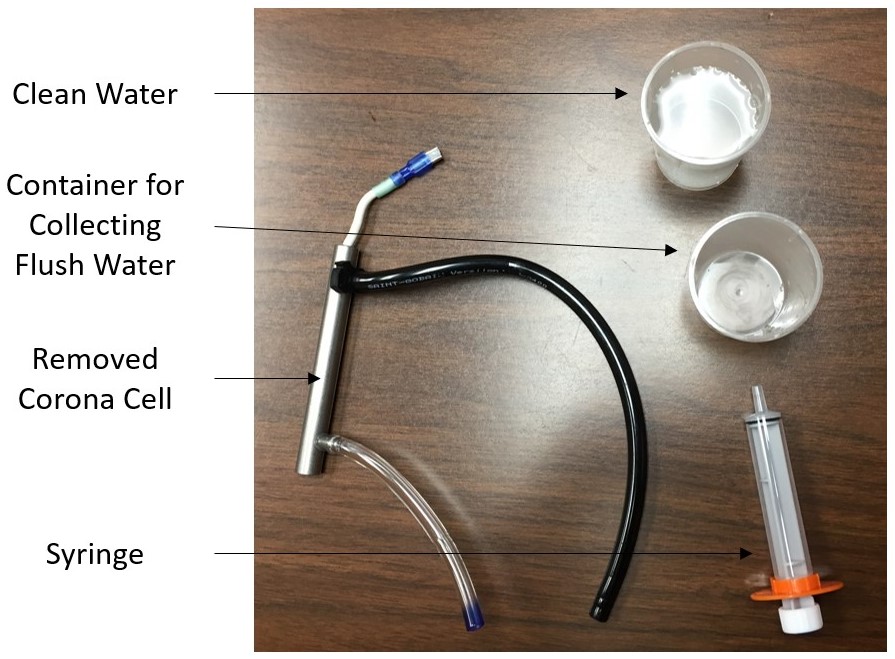
Using a syringe and high purity water, the corona cell should be flushed cleaned annually to ensure optimal performance.